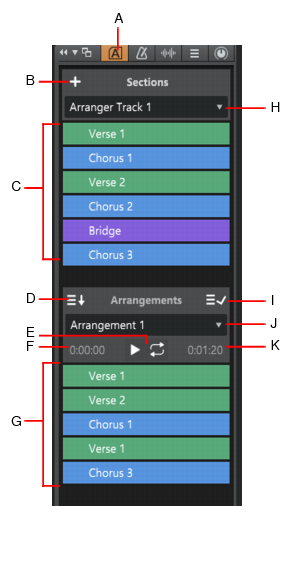
A. Show/hide Arranger Inspector
B. Add section
C. Sections
D. Add all sections to current arrangement
E. Preview current arrangement
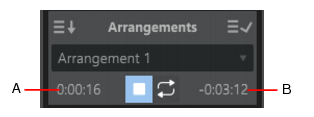
F. Elapsed time
G. Current arrangement
H. Sections menu (select and create new Arranger tracks)
I. Commit current arrangement to project
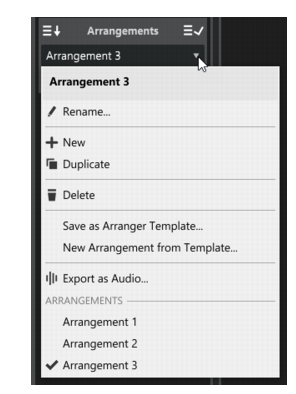
J. Arrangements menu (select and create new arrangements)
K. Remaining time
Sections are the building blocks that make up the song. Each section defines a time range in the project, such as Intro, Verse, Chorus, etc. An
arrangement is an ordered set of sections. You can sort the sections in any order to define the playback order. To do so, drag the sections from the
Sections area down to the
Arrangements area.
The Sections area lists all the Arranger sections defined in the project’s timeline, from which a custom arrangement can be built. The order of the sections reflect the order in which they appear in the timeline.
The Sections list provides an additional way to edit time based selections of the project. Any operation performed in the
Sections list is immediately reflected in the project/timeline, and vice versa.
To copy all sections to the current arrangement, click the Add All Sections to Arrangement button

. If one or more sections are selected, only the selected sections will be copied.
The Arrangements area allows you to sequence sections in a non-linear manner without destructively moving any clip data, regardless of which order they appear in the project’s timeline.
The Sections list is a collection of project sections from which an arrangement can be built. To create an arrangement, drag sections from the
Sections list or from the Arranger track. Any section can appear multiple times within an arrangement (or not at all).
To play the current arrangement, click the Preview button

or press ALT+SPACEBAR (see
To preview an arrangement). The
Arrangements list shows the order in which the sections are played back, from top to bottom.
The Add All Sections to Arrangement button

copies all sections to the current arrangement.
The Preview button

plays back the current Arrangement.
During Arranger preview, the main transport Play button

shows a small “A” icon to indicate it is playing back an arrangement instead of following the project’s linear timeline, and the active section shows a progress indicator.
The Commit Arrangement to Project button

renders the arrangement to the project’s timeline and updates track content accordingly.


(see To commit an arrangement).
, at which time the Arranger track timeline and the Sections list in the Arranger Inspector inherit the structure of the arrangement.
Figure 125. Arrangements menu.During Arranger preview, the main transport Play button.
To insert a committed arrangement into the existing project at the Now Time, right-click the Commit Arrangement to Project buttonand select Insert Committed Arrangement.
Figure 127. Arranger Inspector.A. Elapsed time B. Remaining time