Cakewalk // Documentation // CakewalkSonar // Properties Inspector - Track Properties
Table of Contents Previous Next Index

InspectorsProperties Inspector overview ► Properties Inspector - Track Properties

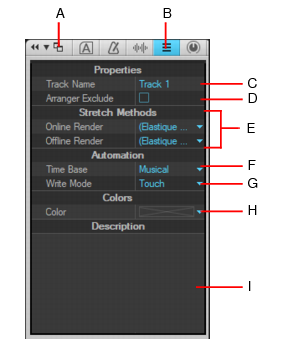
A. Dock/undock Inspector B. Show/hide Track Properties Inspector C. Track name D. Arranger exclude E. Live Articulations F. PDC Latency G. Stretch methods H. Automation Time Base I. Automation Write Mode J. Track strip color K. Text description
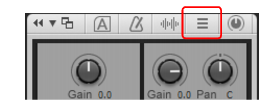
Click the Show/Hide Track Properties button at the top of the Inspector pane, or press CTRL+SHIFT+I.
Figure 301. Click the Show/Hide Track Properties button to show/hide the Track Properties Inspector.
*
Track Name. Assign a name to the selected track.
*
Arranger Exclude. Prevent the track’s data from being selected when you select an Arranger section.
*
Live Articulations. For live MIDI input, echo any transform articulations that are active at the now time. For details, see Articulation maps.
*
PDC Latency. Shows the track’s total plugin delay compensation latency in milliseconds and samples. For details, see LINK.
*
Online Render. Specify the algorithm to use during real-time playback. For more information about render modes, see Algorithms and rendering. The options are as follows:
*
Default. This uses the algorithm listed in the default Online Render field in Edit > Preferences > Audio - Playback and Recording.
*
Groove. Works faster than Percussion render mode, using less processing power.
*
Percussion. Works better than the Groove render mode on percussive material, especially if the stretching is by more than a few beats per minute.
*
Elastique Pro. Elastique Pro is a general purpose high quality time-stretching engine that fulfills the demands of professional productions and broadcast applications. It minimizes stretching artifacts, offers stable timing, inter-channel phase coherence and sample accurate stretching which allows for sharp transients and crystal clear vocals.
*
Elastique Efficient. Elastique Efficient gives you similar time-stretching quality as Elastique Pro, but with a lower CPU hit. The algorithm is targeted at complex polyphonic signals like complete mixes and offers the same transient preservation as Elastique Pro.
Note: The Online render mode is for preview purposes only during playback. The final audio quality will be greatly improved after the Offline render mode is applied during mixdown/export.
*
Offline Render. This drop-down menu lets you choose the algorithm that is used when you export, bounce, or freeze stretched audio. The choices in the drop-down menu are as follows:
*
Default. This uses the algorithm listed in the default Offline Render field in Edit > Preferences > Audio - Playback and Recording.
*
Radius Mix. Better for clips containing polyphonic, stereo data.
*
Radius Mix Advanced. Similar to Radius Mix, but exposes Radius Pitch Coherence and Radius Phase Coherence sliders in Edit > Preferences > Audio - Playback and Recording.
*
Radius Solo. Better for clips containing monophonic, solo instruments.
*
Radius Solo (Bass). Better for clips containing solo bass instruments.
*
Radius Solo (Vocal). Better for clips containing solo vocals.
*
Elastique Pro. Elastique Pro is a general purpose high quality time-stretching engine that fulfills the demands of professional productions and broadcast applications. It minimizes stretching artifacts, offers stable timing, inter-channel phase coherence and sample accurate stretching which allows for sharp transients and crystal clear vocals.
*
Elastique Efficient. Elastique Efficient gives you similar time-stretching quality as Elastique Pro, but with a lower CPU hit. The algorithm is targeted at complex polyphonic signals like complete mixes and offers the same transient preservation as Elastique Pro.
*
Same as Online. Uses the same choice as the Online Render field.
*
Time Base. Choose one of the two options in this section to control what happens to automation when you change the tempo:
*
Musical (M:B:T). If the track is set to the Musical time base, the automation’s M:B:T position stays constant, and its absolute position shifts.
*
Absolute. If the track is set to the Absolute time base, its absolute position stays constant, and its M:B:T position shifts.
*
Write Mode. This drop-down menu lets you choose the automation write mode:
*
Touch. Touch mode overwrites any existing automation data for the currently armed parameter only when the parameter is moved with the mouse or a MIDI controller. Automation writing stops when the parameter is released, and the parameter returns to any previously automated position.
*
Overwrite. Overwrite mode overwrites any existing automation data for the currently armed parameter while the transport is rolling, even if you don’t touch the parameter.
*
Latch. Latch Mode is similar to Touch mode; new automation data overwrites existing automation data when you move a control. However, when you release the parameter, it will remain “latched” into its current position and continue to overwrite any existing automation data until playback stops.
*
Color. Specify the default channel strip color and the default waveform or note color of the selected track. The color palette has two additional options, which can be accessed by holding down the Follow Bus/Default button for a brief moment:
*
Default. The track strip is not colored and does not inherit the color of the bus it is assigned to.
*
Follow Bus. The track inherits the color of the bus it is assigned to.
*
Description. Type a comment or description of the selected track.
Copyright © 2024 Cakewalk, Inc. All rights reserved
Sitemap | Privacy Policy | Legal