Cakewalk // Documentation // SONAR X3 // Loop Construction view
Table of Contents Previous Next Index

View reference ► Loop Construction view

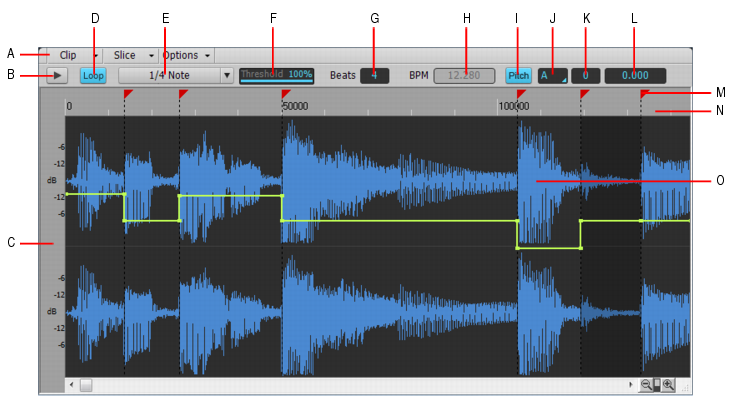
A. Menu B. Preview loop C. Audio scale (drag to zoom vertically) D. Loop on/off E. Resolution F. Threshold G. Beats H. BPM (original tempo) I. Show/hide Pitch envelope J. Root note K. Coarse Pitch L. Fine Pitch M. Slice markers N. Ruler (samples or beats) O. Groove clip
The Clip menu contains the following commands:
list-image
Save Loop. Opens the Save As dialog box. In the Save As dialog box you can save the current loop (Groove clip) as a Riff Wave file, which are compatible with ACIDized loops. You can save Riff Wave files for use with another SONAR project or with ACID.
list-image
Loop On/Off. Groove Clip enable/disable. When enabled, loop clips in the Track view by dragging the right side of a clip with your mouse. When disabled, you are able to slip-edit the clip.
list-image
Stretch On/Off. Instructs SONAR to stretch or shrink the clip to fit the project’s tempo. The Beats in Clip and Original BPM parameters are in the Clip Inspector and Loop Properties dialog box are used to make the change.
list-image
Loop Properties. Opens the Loop Properties dialog box.
Note: The settings in the Loop Properties dialog box are also available in the Groove Clip section in the Clip Inspector.
The Slice menu contains the following commands:
list-image
Reset Markers. Restores all automatically generated markers to the original position and enables all those that were disabled. Manually created markers remain as is.
list-image
Show/Hide Gain Envelope. Toggles on or off the display of a gain envelope.
list-image
Show/Hide Pan Envelope. Toggles on or off the display of a pan envelope.
list-image
Show/Hide Pitch Envelope. Toggles on or off the display of a pitch envelope.
list-image
Next Slice. Moves the slice selection to the next slice in the loop. You can also press the PAGE DOWN key.
list-image
Previous Slice. Moves the slice selection to the previous slice in the loop. You can also press the PAGE UP key.
The Options menu contains the following commands:
list-image
Auto Slice Preview On/Off. Turns on slice auto preview.
list-image
Auto Slice Preview Loop On/Off. This control is only available if the Enable Slice Auto Preview option is on. This option loops the slice auto preview.
list-image
Preview Bus.  Select the output through which you want to listen to the clip.
list-image
Preview . Plays the current loop repeatedly. Click again to stop preview.
list-image
Loop. Click the Loop button to loop clips in the Track view by dragging the right side of a clip with your mouse. When Loop is not on, you are able to slip-edit the clip.
list-image
Resolution. The slice Resolution control sets the resolution for the creation of markers, or the “slicing” of the looped clip. This control uses the following note durations:
list-image
Threshold. The Threshold control senses transients in your audio clip and assigns a marker at the beginning and end of each one it finds. As you increase the number in this field, smaller transients are detected and the number of markers increases.
list-image
Beats. The number of beats (quarter notes) in the clip.
list-image
BPM. The tempo at which the clip was recorded.
list-image
Pitch. The Follow Project Pitch option transposes the loop, if necessary, to the key of the project. A loop recorded in the key of A, used in a project in the key of C, would be transposed up three semitones if the Follow Project Pitch check box was checked.
list-image
Root Note. The Root Note represents the key in which the loop was recorded. The Follow Project Pitch feature uses this information, when checked, to transpose the loop to match the project’s key.
list-image
Coarse Pitch. You can set the transposition of a clip, independent from the project pitch, using the Coarse Pitch field. A positive number transposes the clip up by that number of semitones. A negative number transposes the clip down by that number of semitones. Remember that, if the Follow Project Pitch option is checked, the clip follows the project’s pitch, so any transposition changes you make using this option are changes to the project pitch, not the clip pitch.
An example: The project key is C. The clip key is D. If the Follow Project Pitch option is checked, the clip is transposed down by two semitones. A value entered into the Pitch (semitone) field adjusts the pitch from C. If you enter “-1” the pitch would be transposed down by one additional semitone to B.
Another example: The clip pitch is E. The desired clip pitch is D. If the Follow Project Pitch option is not checked, and a value of “2” is entered in the Pitch (semitones) field, the clip is transposed down two semitones to D from the original pitch of E.
list-image
Fine Pitch. The Pitch (fine) field allows you to make tuning adjustments or to transpose the pitch of a clip up to 50 cents. There are 100 cents in one semitone. A Pitch (fine) setting of 1 adjusts the pitch up one hundredth of a semitone. The Pitch (fine) option can “fine tune” a slightly out of tune clip so that it is in pitch with the remaining clips in a project.
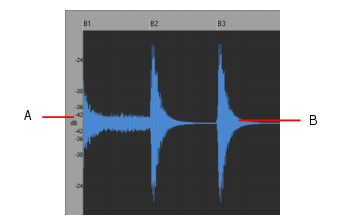
Figure 563. Audio scale ruler
A. Audio Scale Ruler B. Clip
list-image
Percentage. Shows audio scaling by percentage. For example, if the highest percentage in the Audio Scale Ruler reads 2.0%, then only the parts of the waveform which are within 2% of the zero crossing appear in the clip.
list-image
dB. Shows audio scaling by dB. For example, if the highest dB in the Audio Scaling Ruler reads ‑36, then only the parts of the waveform which are 36 dB below 0 dB appear in the clip.
list-image
Zoom Factor. Shows audio scaling by a factor. For example, if the Zoom Factor reads 10, then the waveform is zoomed in by a factor of 10.
Copyright © 2024 Cakewalk, Inc. All rights reserved
Sitemap | Privacy Policy | Legal