Project5 Version 2 - Track Inspector
Last updated on 3/18/2016The information in this article applies to:
- Project5 Version 2
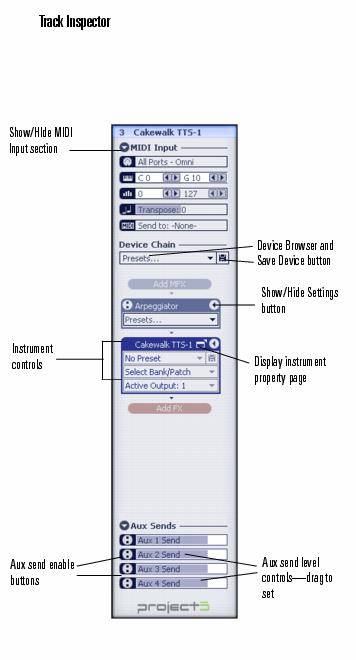
The Track Inspector replaces the old SYN.OPS view. The Track Inspector displays the track information of the track that is currently selected in the Track view. You can show or hide the Track Inspector by clicking the Show/Hide Track Inspector button  that's just left of the Add Track buttons in the Main Control view.

The Track Inspector is divided into three sections:
MIDI Input Section
The Input section of the Track Inspector contains:
- The track name (at the very top of the Track Inspector)
- MIDI input port and channel--this menu filters out any live MIDI input that's not on the listed port and/or channel.
- Key range filter--excludes any live MIDI input that's not in the selected range of notes that is bounded by the low note and high note that you select in these two fields.
- Velocity range filter--excludes any live MIDI input that's not in the selected velocity range that is bounded by the lower velocity and higher velocity that you select in these two fields.
- Input transposition field--transposes live input and patterns up or down by the positive or negative number of half-steps you enter in this field.
- Send to MIDI channel menu--sets the MIDI channel for patterns in this track, and for incoming notes and data when you're playing live. This menu overrides the MIDI channel menu that's in the Editor, unless this menu is set to None.
Note: If you create multiple lanes in a track, each lane has its own instance of the Track Inspector with its own Send to MIDI channel menu. Just highlight each lane in succession to see each lane's Track Inspector. If a lane's Send to MIDI Channel menu is set to None, then each pattern in that lane will play back on the MIDI channel that the pattern contains. Otherwise, patterns play back on the MIDI channel that's listed in that track's Send to MIDI Channel menu in the Track Inspector.
Device Chain Section
The Device Chain section of the Track Inspector contains the device chain, which displays the instrument and effects that a track uses in the order of their signal flow. To hide or show the parameter controls on the instrument or effects, click the Show/HIde Settings button that's on the right end of the titlebar of each instrument or effect.
The Device Chain section has modules that contain the following devices:
- Device Chain menu--use this menu to open the Device Browser, which allows you to choose a device chain for the current track. A device chain is made up of an instrument, effects, parameter settings for the instrument and effects, and remote control assignments for the parameters. Once you've created or edited a device chain, you can click the disk icon to save the device chain for use in other projects.
- Add MFX (Add MIDI effects)-- MIDI effects come first in the device chain's signal flow. When you click the Add MFX button to add a MIDI effect, a popup menu of MIDI effects appears, from which you can select one to insert. You can use as many as your computer's processing power can handle. You can change the order of effects by dragging one from a lower position to a higher one
- Arpeggiator--each track gets its own instance of Project5's powerful new arpeggiator.
- Instrument module (or Add Instrument button if no instrument is loaded)--the instrument comes next in the device chain. If no instrument is loaded in this track, you can click the Add Instrument button to open a list of instruments and ReWire applications. Click the name of a device on the list to load it. After an instrument is loaded, you can open the interface of an instrument or ReWire application by double-clicking the name of the instrument or effect in the device chain, or by clicking the Show Property Page button that's just to the right of each instrument or ReWire name in the device chain. The Bank/Patch menu lets you load factory-supplied sounds for the displayed instrument.
- Add FX (Add Audio effects)--audio effects come last in the device chain's signal flow. When you click the Add FX button to add an audio effect, a popup menu of audio effects appears, from which you can select one to insert. You can use as many as your computer's processing power can handle. You can change the order of effects by dragging one from a lower position to a higher one. After an effect is loaded, you can open the interface of the effect by double-clicking the name of the effect in the device chain, or by clicking the Show Property Page button that's just to the right of each effect name in the device chain.
Note: the device chain supports mouse wheel scrolling.
Aux Sends Section
The Aux Sends section of the Track Inspector contains:
- Aux send enable and aux send level controls for the selected track
See:
The Bus Inspector