Using Envelopes Creatively
Last updated on 3/28/2016|
One of the most cutting-edge features of SONAR is the wide range of automation controls available. While Cakewalk has made use of Volume and Pan envelopes for quite some time, you can now take your projects to the next level through the use of plug-in automation, in addition to standard envelopes. Why are envelopes so cool, you ask? While no one would argue that envelopes and automation give you precise control over your mix with a maximum amount of visual feedback, many people overlook the more creative and non-standard uses for automation. Hopefully, this tip will give you an insight into how to creatively apply automation to achieve things that you didn't think possible!
|
Table of Contents
|
A brief overview on using envelopes
A full description of envelopes is beyond the scope of this tech tip, but we'll try to give you a quick refresher. For a full description, consult the help file in your program by going to Help | Help Contents | Index and typing 'Envelopes' or 'Automation'.
Envelopes are a way to control a parameter, such as volume, over time. As such, an envelope is comprised of two main components; Nodes and Shapes. Nodes define an envelopes value at a certain point in time. For example, if I wanted to create a fade-in starting at measure 3 and ending at measure 5, I would create two nodes, at 3:01:000 and 5:01:000 respectively. The value of the node at measure 3 might be -30db, while the value at measure 5 might be -6 db.
To create a Node on an Envelope, you can double-click on the Envelope or Right-Click and choose Add Node. Nodes can be selected and dragged using the Envelope button on the toolbar. Shapes define how the parameter changes between Nodes. For example, you could create a Linear Fade, which would look like a straight line between Nodes, or you could choose a curved line (Fast or Slow Curve), or even a sudden Jump from one value to another. Shapes can be changed by Right-Clicking on the Envelope between Nodes.
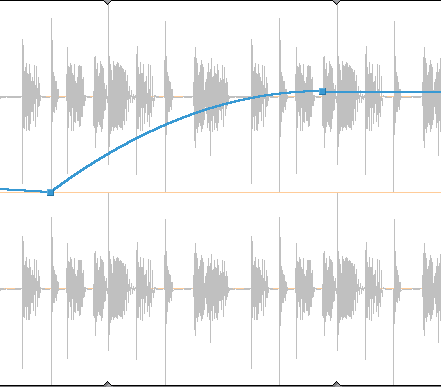
An example of a Fast Curve between two Nodes. In this case the envelope controls Track Volume.
The other alternative to creating Automation is to record it real-time from the GUI (Graphic User Interface) of a DirectX plug-in. Examples of plug-ins that can be automated include FX Delay, FX Reverb, FX Chorus, FX Flanger, FX Eq, as well as the Timeworks Mastering plug-ins that ship with SONAR 2.0 XL.
To record automation, simply insert the chosen plug-in into the FX parameter for a track. Then, when right-clicking on the effect, you'll have the option to Arm Parameters. Selecting this will allow you to choose which parameters you'd like to create an envelope for. While you can certainly arm all parameters, we recommend only recording automation for the parameters you wish to change over time, due to the CPU intensive nature of automation.
Next, simply hit the Record Automation button on the transport and begin to twiddle the sliders. You can always edit the envelopes later. When you hit stop, you'll notice a track envelope has been created for any parameters you armed.
Note: In order to use the Record Automation button, there can be no armed tracks in the project.
In the tips below we'll be drawing in envelopes for accuracy as well as recording them real-time. If you need more information on using automation tools, be sure to consult the Help File in your program.
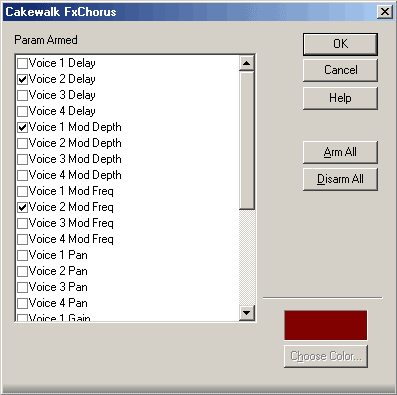
Here you can see the Arm Parameter menu for a Direct X plug-in.
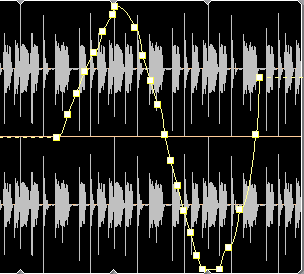
After recording automation, you should see something like this.
Creating drum fills and breaks using FX Delay
If you want to really stay on top of your music, you know that its important to constantly keep things changing; a repetitive loop can sap the life from your work. Its especially important that when doing loop-based composition, you don't let laziness get the better of you.
There are a lot of ways to change things up such as using Cyclone DXi to recycle an existing loop. But there's an even easier way to add dynamics to a loop without putting it under the knife.
In addition to creating spacey sound effects and fattening guitar solos, delay can add a subtle swing to a drum loop. You can exploit this to create fills and crescendos by manipulating the amount of delay on a drum track over the course of time. Lets start with a basic drum loop. You can download it here.
Now, lets insert the FX Delay and setup some basic parameters. First, in order to create a delay that's in time with our project, we need to set the delay time in milliseconds. You can figure out the appropriate delay time by dividing 60,000 (the number of milliseconds in one minute) by the current Tempo (measured in beats per minute) of your project. So for a tempo of 85 bpm, like in our current project, you'll need to set a delay time of 705 ms to have the echoes fall on the quarter note. To have the echoes fall on the eighth note, divide in half, for sixteenths, divide by four. Too much work? Fair enough, download the free AnalogX delay calculator and save yourself some time. Remember, you don't always need to be exact, rounding off can produce an interesting swing.

The handy AnalogX Delay Calculator lets you save your brain-power for other tasks.
For this example we're only going to use one voice of the delay, and we're going to set it to 180, which will fall roughly on the quarter note. Now, we'll set the feedback to be -72%. By choosing a negative value, we specify that the delay is out of phase with the original. Don't worry about the Mix level yet.
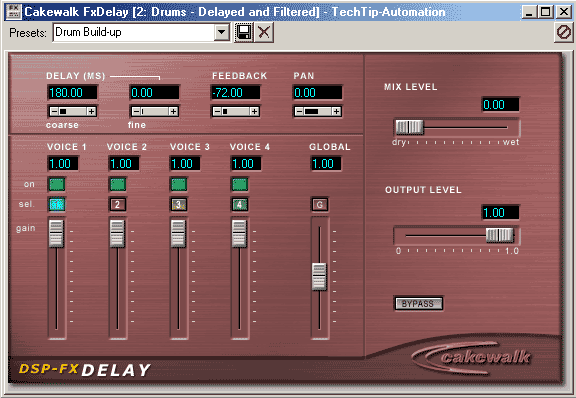
FX Delay: awaiting some serious tweaking
Now that you've got the delay set up, we'll put in some automation to change the mix amount over time, creating a build up, perfect for segueing from one part to another. You can either draw in the automation manually, or record it using the methods described in the beginning of the article. This is what our envelope looked like after some tweaking. Click here to listen to the results.

An automation curve controlling FX Delay's Mix Level.
We've added some rhythmic variation using delay, but how about some tonal variation as well? Lets go one step further by adding some lo-pass filtering to the drum track. We should also stress that effect automation isn't limited to just Cakewalk plug-ins. Plugin automation is a feature of DirectX 8 and therefore there are plenty of 3rd party plug-ins we can take advantage of too. For example, we're going to use SpazTek's Filter King 1.0 resonant low pass filter in this example. You can download this free plug-in at SpazTek's home page. **As of 12/08/2008 this plug-in is no longer available **
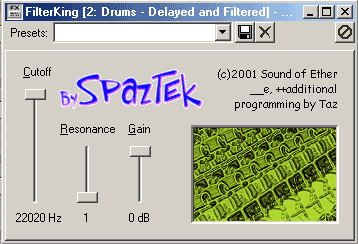
SpazTek's free FilterKing plug-in
We'll record two parameters this time, one for cutoff frequency, one for resonance. Warning: High Resonance settings can create extreme frequencies that can damage your speakers or annoy your dog.
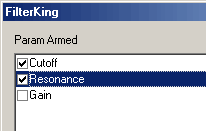
Arm Cutoff and Resonant Frequency
After recording some additional automation on our drum track, this is what we came up with. Take a listen here.
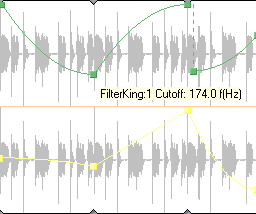
Envelopes controlling Cutoff and Resonant Frequency
Plug-in automation has the power to let you use plug-ins in ways you never thought of. For instance, we can even create extreme band pass and notch filtering in Cakewalk by using the included FX Eq. We'll start with a cool but maybe lackluster synth line. Here's what it sounds like.
First, insert the FX Eq into the track. For this example we'll only need two bands for the automation but you can use more bands if you'd like. Start by raising the Gain for the chosen band all the way. Now move the Course Frequency for that band all the way to one extreme. Next, go to Arm Parameter and select the the Course Frequency for your chosen band. Now rewind, hit the Record Automation button and record a nice smooth sweep as the clip plays. Now you have a basic filter sweep but lets make it a little more interesting.
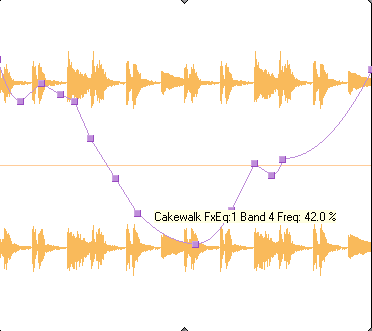
Our initial pass with the FX Eq
1. Close the EQ properties and using the envelope tool (E) select all of the nodes in the envelope.
2. Now choose Edit > Copy and check only 'Track/Bus Automation'. Now a copy of the envelope is stored in the clipboard.
3. Right-click on the envelope and choose 'Assign Envelope > FX Eq' Select the Course Frequency for the other active band in your EQ.
4. Drag the entire envelope down or up so that it is controlling a slightly different frequency range than it was originally.
5. Finally, choose Edit > Paste and paste the 'Track/Bus Automation' that you previously copied, back into the track.
6. You should now have two envelopes with the same shape but skewed so that they control different frequency ranges. You can then make additional edits in the Track View.
This clip was created using the synth line and the method above.
Frequency modulation made easy
Frequency modulation is a form of processing which can create and amplify sidebands in audio. Thanks to the flexibility of settings in FX Delay, we can create modulated sounds directly in Cakewalk with only an audio track and the delay. Now these sidebands can create a result that is quite tonal, so its necessary to take the rest of the project into account when 'tuning' the effect. In addition, by using an EQ before the FX Delay, we can emphasize the frequencies that respond better to modulation, thus creating a stronger resulting signal. Here's how its done:
1. Start with a basic loop. We are using a percussion loop that sounds like this.
2. Insert an FX Eq, and then an FX Delay. Close the EQ Properites for now.
3. Turn off all voices except for Voice 1 in the Delay. Set Feedback and Mix level to 100%. Set Course Delay to 0.0.
4. Loop the clip and adjust the Fine Delay time until you get a good result. Try to fine two or three settings that are 'in tune' with your current project.
5. Open up the FX Eq and play with reducing/increasing specific frequencies to increase the responsiveness of the Delay.
6. Right-click on the track and choose 'Envelopes > Create Track Envelope > FX Delay'. Select Voice 1 Delay (fine).
7. Create several nodes and snap them to beats or measures. Set the shape to 'Jump' in between each of the Nodes.
8. Adjust the envelope between the nodes to change the Fine Delay time and thus the sideband frequencies. Keep FX Delay open so that you can use the visual feedback to determine when the envelope is at the right spot.
9. While this effect can get a bit repetitive for the length of a song, it can be really useful for breaks, intros, bridges or wherever you need some fresh sounds.
This is just a sample of the virtually limitless things you can do armed with a few handy effects, some envelopes, and of course, your imagination.