The Complete Guide to Using Rewire — Part 4
Last updated on 3/28/2016SPECIFIC APPLICATIONS FOR REASON
Put this powerful protocol to use in your SONAR projects
By Craig Anderton
|
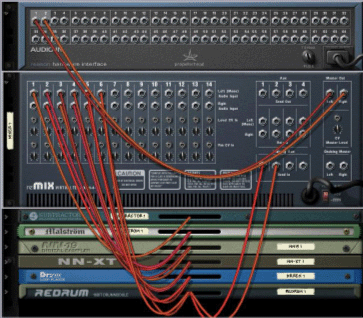
PART 4: Using Reason with SONAR/Home Studio APPLICATION #1: CREATING A BASIC MULTI-TIMBRAL SYNTH RACK Reason makes a great synth rack for SONAR/Home Studio: you get two samplers, a graintable synth, subtractive synth, Rex file player, and drum machine…and you can open up multiple instances of each one. Because Reason is so efficiently coded, you can open up a lot of instruments before most modern computers will start to complain. To get familiar with running the instruments from SONAR/Home Studio, create a default Reason song with at least one of each module. To create a simple rack: 1. Close SONAR/ Home Studio and open Reason. Reason will probably load the default song. |
Table of Contents PART 1: BASIC Q&A PART 2: SETUP PART 3: Specific Applications for Project5 PART 4: Specific Applications for Reason
|
3. Navigate to the Template Songs folder (path for normal installation: C Drive > Program Files > Propellerhead > Reason > Template Songs).
4. Select Empty Rack.rns and click on Open.
5. Start populating the rack with a mixer module - go Create > Mixer 14:2.

6. Go Create > SubTractor Analog Synthesizer. This adds the synth to the rack.
7. Similarly, add the Malstrom Graintable Synthesizer, NN19 Digital Sampler, NN-XT Advanced Sampler, Dr. Rex Loop Player, and ReDrum drum computer. If desired add more than one of each.
8. Hit the Tab key. Note that the instruments all patch into the Mixer, and the Mixer out goes to Channels 1 and 2 of the Hardware Interface. Hit Tab again to return to the front panel.
9. Go File > Save As and navigate to the Template Songs folder. Call the file Basic SONAR Rack.rns (or Basic Home Studio Rack.rns), then click on Save.
Now when you insert Reason into SONAR/Home Studio, you can call up this file at any time and use the modules you've inserted. However, you can also set Reason's Preferences so that this becomes the default file whenever you open Reason (or insert Reason into SONAR/Home Studio). To do this:
1. In Reason, go Edit > Preferences.
2. Under Default Song, click the Custom radio button.
3. Click on the Folder icon (on the same line as the Custom button).
4. Navigate to the Template Songs folder and click on the Basic SONAR Rack.rns file you created, then click on Open.
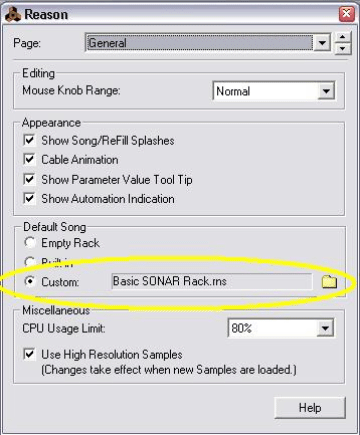
5. Close Preferences.
APPLICATION #2: USING REASON AS A MULTI-TIMBRAL SYNTH MODULE FOR SONAR/HOME STUDIO
1. Close both Reason and SONAR/Home Studio if either one is open.
2. Open SONAR/Home Studio. For now, just close out of the Quick Start dialog to retain the default project (2 audio and 2 MIDI tracks).
3. Go Insert > ReWire Device, and select Reason.
4. The Insert DXi Synth Options window appears. Refer to the section "Inserting a ReWire Device Into SONAR/Home Studio" for general guidance on which boxes to check or uncheck. For now, check MIDI Source Track, First Synth Output, Synth Property Page, and Ask This Every Time. Leave All Synth Outputs and Synth Rack View unchecked.
5. After selecting your options, click on OK.
6. Assuming you've made Basic SONAR Rack.rns the default file, Reason will load this file. If you did not make this file the default, go to Reason's File > Open and load the Basic SONAR Rack.rns file. In either case, if you scroll up and down the Reason rack, you'll see the various modules you selected.
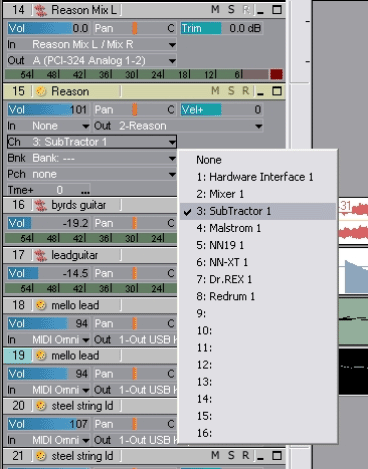
7. Switch over to SONAR/Home Studio. Upon inserting Reason, SONAR/Home Studio created an audio track for Reason's stereo mixer outs, and a MIDI track to drive them, after the existing tracks (with the Normal SONAR/Home Studio template, these show up as tracks 5 and 6 respectively). Minimize tracks 1-4 and maximize tracks 5 and 6 so you can see all their track parameters.
8. Set up SONAR/Home Studio Track 6 to drive a Reason module. We'll start with SubTractor. The track's Out parameter should allow Reason as an option; select it if needed.
9. Click on the MIDI track's Ch(annel) parameter, and you'll see a list of all the available instruments in Reason. Select SubTractor.
10. Play a few keys to verify that you can hear the sound. If you don't hear anything, make sure SONAR/Home Studio's Audio Engine is enabled (the icon on the Transport bar between the Automation Record and Reset icons should be "pushed in"), and that any controller's volume control is up - Reason responds to Controller 7 (Master Volume) messages.
11. Click on the Record button for Track 6 (the MIDI track driving Reason) to arm recording, press the Transport Record button, and start playing. Click on Stop when you're done.
12. Check out some of the other instruments. Insert a new MIDI track (Track 7), select Reason for the Out parameter, then assign Ch to Malstrom.
13. Click on the Track number assigned to Malstrom and play some notes. You'll hear the Malstrom default patch. Stop playing, then click on Track 6's track number. Play again. Now you'll hear SubTractor.
14. Continue inserting tracks and assign them to instruments as desired. Note: ReDrum and the Samplers won't make any sounds until you load them with a patch.
As you keep adding tracks of Reason instruments, note that you can trigger notes for any of the instruments by just clicking on the appropriate SONAR/Home Studio track. This makes it very easy to do overdubs, or tweak Reason's parameters.
Also note that the ReWire implementation has a special feature: if you record a track that's assigned to ReDrum, the Piano Roll inserts the drum names for notes - you don't need to create a drum map to see which notes correspond to which drum sounds. This is very convenient.
APPLICATION #3: TWEAKING SOUNDS IN REASON WHILE USING REWIRE
In the previous tutorial, we played the SubTractor and Malstrom default patches, which aren't all that exciting. However, you can freely call up, edit, and save patches while Reason is running as a ReWire slave. For example…
1. Using the setup described above, click on the track number of the track that drives the Subtractor synth.
2. Switch over to Reason and locate SubTractor in the rack.
3. As you play, tweak the parameters as desired with the mouse, and/or go to the Patch area and click on the Folder icon to load a new patch.
IMPORTANT NOTE: When you save a SONAR/Home Studio project that incorporates a ReWire device, next time you open the project, SONAR/Home Studio will automatically load the ReWire device. However, any tweaks you made to the ReWire device are not saved with the project.
Before closing SONAR/Home Studio, save a modified Reason rack with a suitable file name in the appropriate SONAR/Home Studio project folder. Then close Reason and SONAR/Home Studio. Next time you open the desired SONAR/Home Studio project, use Reason's File > Open command to load the file containing the tweaked parameters and patches.
APPLICATION #4: RECORDING CONTROLLER TWEAKS IN REAL TIME
How controllers are automated depends on your setup. The SONAR/Home Studio documentation say that Reason and SONAR/Home Studio cannot share MIDI I/O, however this is not necessarily true. Sharing I/O does place some limitations with respect to using Reason's MIDI Remote control option to adjust parameters, but there are workarounds for this. The following applies to a setup using one MIDI controller, one MIDI port, and some assignable controller knobs (e.g., mod wheel, data slider, etc. that can be assigned to different controller numbers).
With this type of setup, you can do real-time tweaking of any parameter listed in Reason's MIDI implementation chart (this is a PDF file included on the Reason CD; if you did the standard installation, it's accessible from Start > Programs > Propellerheads > Reason > MIDI Implementation Charts). Note that you need Acrobat Reader installed in order to read PDF files.
NOTE: The process we're about to describe does not involve using the MIDI Remote option in Reason, which is how we get away with using a single MIDI port.
For example, suppose you want to automate SubTractor's Amplitude Envelope Decay parameter. Here's how.
1. Refer to the MIDI Implementation chart and find the Amp Env Decay parameter. This is controlled via MIDI Controller #9.
2. Assign the controller you plan to use so that it transmits data over Controller #9.
3. Switch over to Reason and move the control knob or slider you want to use. SubTractor's Amp Env Decay slide should follow your motions.
4. Record the track normally in SONAR/Home Studio while playing notes and/or tweaking the control knob. After you stop, you'll see the note and controller data in the Clips View.
5. Switch over to Reason and rewind back to the beginning, then press Play (or do this in SONAR/Home Studio, then switch over to Reason). The part will play back, and you'll see Reason's Amp Env Decay follow the controller data.
Some parameters you might want to automate (specifically, Filter Frequency, Filter Resonance, LFO 1 Amount, Phase Difference, and FM Amount) can be tied in with the mod wheel; each also has an Amount parameter that determines how much the mod wheel affects the parameter.
If you want to modulate only one of these parameters, no problem. Use the listed MIDI controller number, or set the parameter's corresponding Amount knob (in the bend/mod wheel section) for the desired maximum amount of modulation when the mod wheel is up full, then record mod wheel motion into the MIDI track. For example, to modulate the Filter Frequency with the mod wheel, turn up the F. Freq control as desired, then record the wheel motions.
Furthermore, independent modulation for these parameters is also possible because each of the Amount knobs in the bend/mod wheel section can be MIDI-controlled. Therefore, if you set the mod wheel amount to maximum, you can then modulate the Amount controls to tweak specific parameters individually. For example, modulating the F. Freq control (which responds to MIDI Controller #33) will vary the filter cutoff, while modulating the LFO1 Mod Wheel Amount (MIDI Controller #35) will modulate that parameter independently.
APPLICATION #5: USING MULTIPLE REASON OUTPUTS IN SONAR/HOME STUDIO
This is an advanced application that lets each Reason instrument output show up as a separate SONAR/Home Studio track, rather than feeding them all into a stereo mix. Therefore, each instrument can have it own audio processing in SONAR/Home Studio, and track data (level, pan, effects send, etc.) can be automated within SONAR/Home Studio.
Here's how to set up SONAR/Home Studio & Reason for multiple outputs.
1. When you insert Reason as a ReWire device, uncheck First Synth Output (Audio) and check All Synth Outputs (Audio).
2. SONAR/Home Studio inserts Reason and then creates 64 tracks - one for each audio output in Reason.
3. Use Reason's patch bay to connect the instruments in your Reason rack to the desired outputs.
4. To simplify the Track View, hide tracks that correspond to unused outputs (while in the Track or Console View, access the Track Manager to show/hide tracks with the M keyboard shortcut).
For example, suppose you've set up a Reason rack with 2 Malstroms, 2 SubTractors, and 2 NN-XT samplers. Reason outs 1 and 2 are tied in stereo; the rest are mono. We'll assume there are no other tracks in SONAR/Home Studio except for those that represent ReWire instruments.
In most cases, each stereo instrument will end up using two of the mono inputs and take up two tracks. You might patch the instruments as follows:
Malstrom 1: Reason Outs 1+2 (appears over SONAR Track 1, which is stereo)
Malstrom 2: Reason Outs 3+4 (appear over SONAR Tracks 2+3)
SubTractor 1: Reason Out 5 (appears over SONAR Track 4)
SubTractor 2: Reason Out 6 (appears over SONAR Track 5)
NN-XT 1: Reason Outs 7+8 (appear over SONAR Tracks 6+7)
NN-XT 1: Reason Outs 9+10 (appear over SONAR Tracks 8+9)
You can now hide (or delete) all Audio tracks in SONAR/Home Studio from Track 10 on up.
APPLICATION #6: PLAYING REX FILES IN SONAR/HOME STUDIO (OPTION 1)
SONAR/Home Studio's on the fly time-stretching abilities let you use loops of various tempos and have them all work together - very cool.
Another method of accomplishing a similar result was devised by Propellerhead Software several years ago, called the Rex file format. This file format "slices" a piece of digital audio into several pieces, and triggers them based on their position in a sequence. Thus, if the sequence slows down, the triggers occur further apart and the slices play back at a slower rate. The reverse occurs if the sequencer speeds up.
The Rex file format is used by quite a few sequencers that lack built-in time-stretching, and as a result, there are numerous sample CDs with Rex format files. Although SONAR currently doesn't read Rex files, until it does there's a simple workaround if you run Reason as a ReWire device.
There are two main options:
- Create a sequence in Reason that triggers Rex files stored in Reason's Dr. Rex file playback module (remember, under ReWire, the SONAR/Home Studio and Reason transports are locked together)
- Create a sequence in SONAR/Home Studio that drives the Rex file
For situations where you're using Reason's stereo mixed outputs instead of one-track-per-instrument, the second option is far more flexible because if the Reason Dr. Rex files loop continuously, then you'll need to use track automation to change the Dr. Rex levels. Yet any changes made to the stereo outs will affect any other instruments feeding those outs. When Dr. Rex is driven by a MIDI file in SONAR/Home Studio, you can modify the data within SONAR/Home Studio — for example, just cut out a chunk if you want the sound to go away, or edit velocities to change dynamics. Here's one way to do Rex files in SONAR/Home Studio.
1. Set up SONAR/Home Studio and Reason to function as ReWire devices.
2. Have at least one Dr. Rex module in your Reason rack.
3. Use Dr. Rex's Browse option (accessed by clicking on the folder icon) to find a Rex file you want to use. If you don't hear any sound, make sure SONAR/Home Studio's Audio Engine is on (the engine icon in the transport bar should be "pushed in"; if not, click on it).
4. After finding a sound you want to use, load it into the Dr. Rex module that currently has the focus.
5. Some sample CDs with Rex files also include a companion MIDI file for triggering the audio slices at the right times. If not, you can create one. In Reason, go File > Export Rex as MIDI File, and click on Save.
Now Reason is set up. Let's proceed to SONAR/Home Studio.
1. Locate the MIDI file you just created, or the corresponding one from the sample CD, and drag it into a SONAR/Home Studio MIDI track. Or, use SONAR/Home Studio's Open command to bring the MIDI file into a new document, then drag the file over from there.
2. Make the correct assignments for Reason on the SONAR/Home Studio MIDI track. The Out parameter should say Reason, and Channel should show the name of the currently selected Dr. Rex module in Reason.
3. Copy and paste the MIDI data as desired to play back the Rex file.
Press Play on SONAR/Home Studio (or in Reason, whatever works for you), and the MIDI data in the SONAR/Home Studio track will play back the "slices" of digital audio in Reason's Rex file player.
APPLICATION #7: PLAYING REX FILES IN SONAR/Home Studio (OPTION 2)
If you're using individual outs as described in Application #6, there are more possibilities on how you work with Rex files. For example, I created a sample CD of guitar sounds in Rex file format that I use a lot. I created a "Rex Rack" in Reason with eight Dr. Rex players that are rewired into SONAR/Home Studio using multiple outputs. The MIDI data is in the SONAR/Home Studio tracks driving the Rex file players.
As each Dr. Rex appears on its own track, the audio can be automated and processed independently for each Rex file..
APPLICATION #8: CONSERVING CPU POWER (OPTION 1)
With fast computers, you may run out of musical good taste before your computer runs out of power for driving Reason instruments. But in older or slower computers, when using lots of soft synths, SONAR/Home Studio's CPU meter might come uncomfortably close to red-lining.
In situations like this, you can save CPU power by converting soft synth tracks to hard disk audio tracks, which stress out the CPU far less. Here's how to bounce.
1. Click on the track number for the MIDI track driving the soft synth(s).
2. Control-click on the track number(s) for the soft synth(s) you want to bounce. Both the MIDI and audio tracks must be selected for bouncing to work.
3. Mute all other tracks, and for safety's sake, solo the tracks you selected.
4. Identify the bus being fed by the audio track(s). We'll use Bus A as an example.
5. Observe the Bus A playback meters while you play the part you want to bounce. If there is any distortion, reduce the level of the audio track(s) feeding Bus A.
6. In SONAR/Home Studio, select the range of measures you want to bounce.
7. Go Edit > Bounce to Track(s). A window shows up with the Destination track, format, the Source Bus from which the signal is derived, and the "Mix Enables." I generally just leave all the Mix Enables checked, because if it says to use Master FX and there's no Master FX, it doesn't matter. But if there is a Master FX being used and I don't check the box, the results of adding the effect won't show up in the bounced signal.
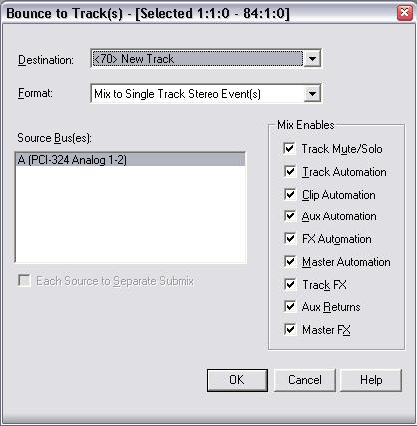
8. Click on OK, and the audio is bounced to a new track. This will include any processing you may have added.
9. Now Archive the audio track in which the Reason instrument appears, as well as the MIDI track driving it. (To Archive a track, in the Track view right-click on a blank space in the track, and select Archive.) Archiving, unlike simple muting, prevents these tracks from loading the CPU - when muted, the tracks remain active so they can appear instantly when unmuted.
10. Continue working on your project using the bounced hard disk track instead of the archived ones. If you decide the bounced track needs redoing, no problem - erase it, then unarchive the original tracks and try again.
APPLICATION #9: CONSERVING CPU POWER (OPTION 2)
Increasing latency a bit allows the CPU not to work as hard. With my setup, the usual latency is under 3 ms. Increasing that to 11 ms cuts CPU power dramatically, yet the "feel" isn't compromised very much.
Here's how to change the latency setting.
1. Go Options > Audio.
2. Under Mixing Latency, adjust the Buffer Size or Buffers in Playback Queue and observe the Effective Latency.
3. Increase the latency to the maximum you can stand (which is about 11 ms for me).
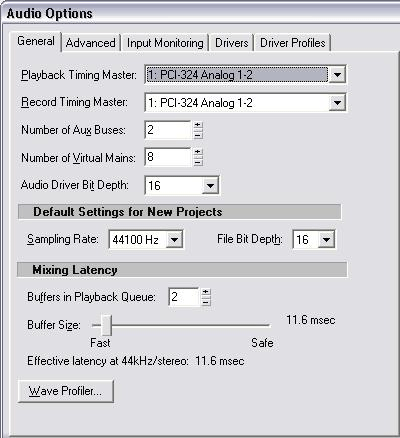
Note that increasing either the buffer size or number of buffers produces similar end results. However, at least with my system the CPU stresses out less if I increase buffer size and keep a small number of buffers in playback queue. Specifically, my "low latency" setting is 2 buffers with a buffer size of 2.9 ms. My "let's be nice to the CPU" setting is 2 buffers with a buffer size of 11.6 ms.
I hope this document will help you exploit ReWire to its fullest, particularly when using Reason with SONAR or Home Studio. Either program by itself is way cool, but put them together, and the results will astonish you. Have fun!