Getting the Perfect Vocal Take with SONAR 5+
Last updated on 3/29/2016By Nick Dika
Let’s face it, even the best singer can get tripped up by a tricky rhythm, a wide interval, or that high note that is just barely in his or her range. So how do you get the perfect take without re-recording the whole vocal dozens of times? SONAR includes features that make this process much easier.
Loop Recording and Track Layers
First, to capture a number of vocal takes in SONAR, try using Loop Recording. By setting loop points in the ruler at the top of the screen, SONAR will keep recording new takes until you hit stop. You can set loop points at the beginning and end of your entire song, or just on a small section that you want to perfect.
In the project shown below, after the initial vocal pass, the loop points were set around only the first chorus of the song. After hitting record, the singer sang through the section three more times. The track will automatically open into layers after you hit stop, revealing all of the captured takes. Layers can also be shown or hidden with a click of the mouse.
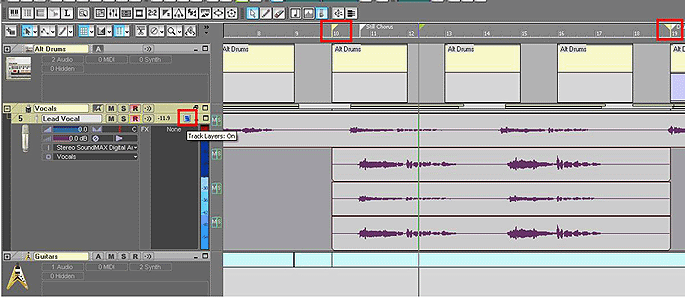
Fig. 1 Showing Loop Points & Show Track Layers Button
Once you’ve captured a number of takes, you can use the mute and solo control on each of the track’s layers to listen to each performance and find the best one. If you want to quickly hear the content of one clip or layer, you can also select the clip you want to hear and hit Shift + Spacebar to play back only the selection.
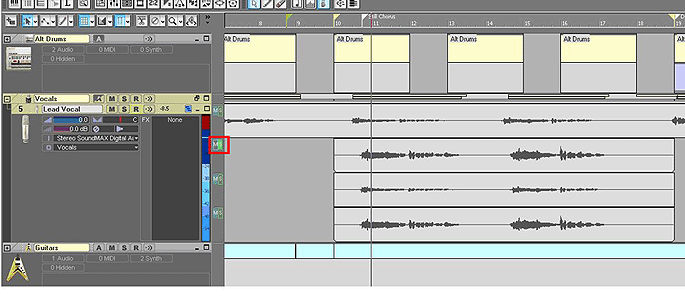
Fig. 2 Showing Per-Layer Mute & Solo
Comping
In some cases, you may find that even after doing multiple takes, none of them alone is quite what you were looking for. That’s where “comping” comes in. Comping is the process of splicing together multiple takes to create one seamless part. By using SONAR’s Mute and Isolate tools, you can easily build the perfect take out of several “almost perfect” takes.
With track layers open, enable the Mute Tool from the Track View’s toolbar or hit [k]. Next, choose “Mute Time Ranges” from the tool’s drop down options menu. To mute a section of a take, drag over the bottom section of a waveform. You’ll see a dotted line around the waveform when it’s muted. Because this tool is completely non-destructive, you can simply drag over the top portion of the waveform to un-mute it.
Once you have the mute tool enabled, you can also easily isolate a section of one take while simultaneously muting all of the other takes in the same time range. To do this, hold CTRL while dragging across a clip with the mute tool.
In the example below, none of the takes stood on its own, but one part of each of the takes sounded great. The mute tool was used to isolate sections of each of the four performances that sounded the best. The end result is a seamless vocal track that sounds like it was performed in one take.
Note: the mute tool follows your Snap To Grid settings. If you want the mute tool to lock to note values (for example a measure or sixteenth note) set your snap to grid settings accordingly. If you want extremely fine control when using the mute and isolate tools, simply de-select Snap To Grid for freehand editing.
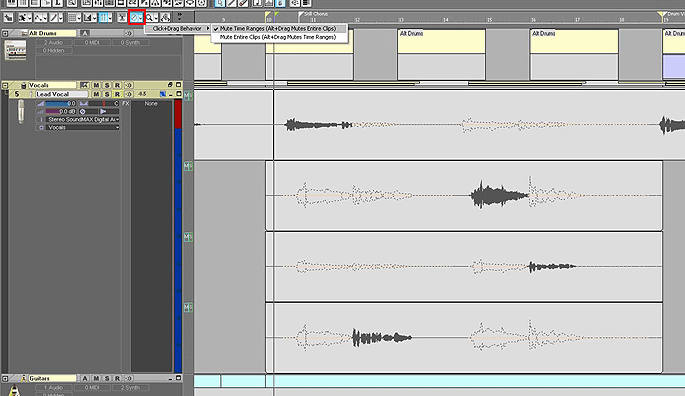
Fig. 3 Showing Mute Tool Button & Partially Muted Clips
Correcting Pitch Fast
Sometimes an otherwise perfect vocal take is marred with a couple small pitch problems. This is where V-Vocal (Producer Edition only) really comes in handy. V-Vocal can be added by selecting the section of the vocal you want to fix (or selecting an entire audio clip) and then right clicking on the clip and choosing V-Vocal | Create V-Vocal Clip from the drop down menu. You can even add V-Vocal to many clips throughout your project if you need to.
When you first open V-Vocal, you’ll see yellow lines on a grid which represent the pitch of the notes in the vocal part. From this view you can manually adjust the pitch by re-drawing these lines using the tools on the left hand side of the V-Vocal screen. To automatically fix pitch problems, use the tools in the lower left corner of V-Vocal’s interface.
For quick fixes, just select the section that needs fixing inside of V-Vocal, then adjust the Note, Vibrato, and Sense knobs and hit Correct. Try starting with all of these knobs set to about 75-80%. This will move notes toward the closest chromatic note on the grid, but they will retain the vibrato and slight variations that keep the vocal sounding natural. After you’ve hit correct, the yellow lines will move on the grid and you’ll notice there are now orange lines that represent what the original pitch was before you corrected it.
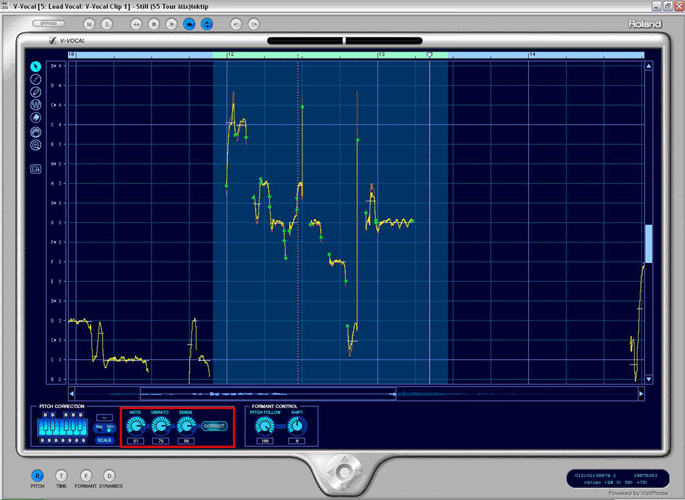
Fig. 4Roland V-Vocal
Didn’t like the result? Simply hit V-Vocal’s Undo button to step back. Now try adjusting the settings and re-correcting until it sounds just right. For more precise corrections, you can use the manual pencil or line tools to touch up notes and transitions. You can even use the LFO tool to draw in or remove vibrato.
Locking vocals to scale
If you know the key you’re working in, you can also use the scale-based correction tool to automatically lock vocals to the right key.
First, choose whether you’re working in a Major or Minor key and enable the Scale button. Next, choose the root note of the scale from the keyboard at the left of the V-Vocal interface. You’ll now notice that notes from that scale have been blacked out on the keyboard and the grid. When you hit Correct, V-Vocal will adjust notes to the scale of your choosing!
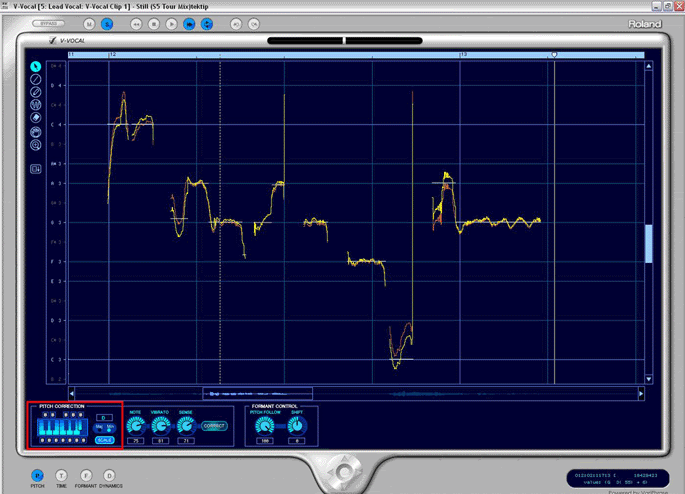
Fig. 5 V-Vocal with Corrected Pitches
For a more in depth look at Roland V-Vocal, check out the following videos from our YouTube site:
V-Vocal In Depth
Basic V-Vocal Editing
Advanced Vocal Editing Techniques